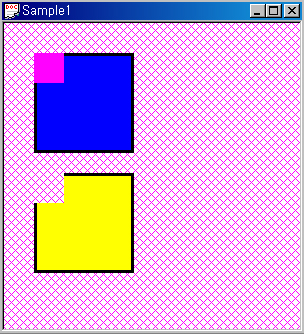
위에가 원본 bitmap 밑이 투명처리와 색 변환을 적용한 CachedBitmap.
자주색은 투명처리, 파란색은 노란색으로 변환.
투명처리 및 색 변화 모두 ImageAttributes 라는 객체에 값을 설정해서 Graphics객체의 DrawImage 등을 호출할때 인자로 넣어주면 된다.
GeSHi © 2004, Nigel McNie
{
Bitmap tmpBit( markTp_.GetWidth(), markTp_.GetHeight(), PixelFormat32bppARGB );
ColorMap tplToinner;
tplToinner.oldColor = tplColor_;
tplToinner.newColor = innerColor;
ImageAttributes imgAttr;
imgAttr.SetRemapTable(1, &tplToinner,ColorAdjustTypeBitmap);
imgAttr.SetColorKey(transColor_, transColor_,ColorAdjustTypeBitmap );
pMemGraphics->DrawImage(&markTp_, Rect(0,0,tmpBit.GetWidth(),tmpBit.GetHeight()),
0.0,0.0,markTp_.GetWidth(), markTp_.GetHeight(), UnitPixel, &imgAttr, NULL, NULL);
delete pMemGraphics;
CachedBitmap* ccBit = new CachedBitmap(&tmpBit, g);
return ccBit;
}
Parsed in 0.057 seconds
코드는 대략 이런 느낌.
주의할 점은 Bitmap->CachedBitmap으로 바꾸면서 위의 내용을 적용할수가 없기때문에 Bitmap -> 변환된 Bitmap -> CachedBitmap 으로 간다. Bitmap의 변환에는 Graphics객체를 따로 생성해서 그려주는 수밖에 없는듯하다.
